How to Publish Content
COE website content is organized according to user group. All content belongs to a particular user group, and that will determine where it is displayed on the site. There are four types of content that you can create:

- Announcements – Announcements are short news items related to the user group.
- Events – Events are calendar entries for upcoming user group activities.
- Galleries – Galleries are collections of photos relevant to the user group – see Creating Image Galleries for information on creating galleries.
- Group Pages – Group Pages can be used to display additional user group information.
Note: Announcements, Events, and Galleries will automatically be displayed on the landing page of the user group to which they belong. Group Pages, however, must be linked manually, usually by adding them to a menu, which can only be done by Admins and Content Creators.
How to Create Content
To create new content, you’ll click on the link for the type of content you want to create. Below are detailed instructions for creating each type.
Creating an Announcement:
- Go to the user group for which you want to create an Announcement.
- Click the Announcement link at the top of the page.
- On the Create Announcement screen, enter a Title and text for the Body of the Announcement. Note that your title will be the URL of your page.
- When you are done, you can click the Preview button see what your Announcement will look like, or you can hit the Save button to post it immediately. (You can always go back and make changes later.)
- Your Announcement will appear in the sidebar of the user group’s landing page.
Creating an Event:
- Go to the user group for which you want to create an Event.
- Click the Event link at the top of the page.
- On the Create Event screen, enter a Title, Body and Start & End Date for the Event.
- When you are done, you can click the Preview button see what your Event will look like, or you can hit the Save button to post it immediately. (You can always go back and make changes later.)
- Your Event will appear in the sidebar of the user group’s landing page as well as on your site’s Calendar page.
Creating a Gallery:
- Go to the user group for which you want to create a Gallery.
- Click the Gallery link at the top of the page.
- On the Create Gallery screen, first enter a Title and a Description for the Gallery.
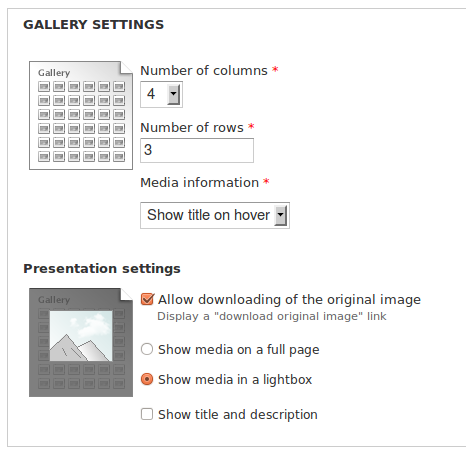
- Under the Gallery Settings heading, you can choose options for the way your new Gallery will be displayed. There are options both for the Gallery landing page, which will display thumbnails of all of the images, as well as for the slideshow view, which people will see when they click on one of the Gallery images.
- The first three options here are for the Gallery landing page:

- Number of Columns – Chose how many columns of thumbnails you’d like on the Gallery’s landing page. This will affect the size of the image thumbnails?the more columns, the smaller the thumbnails.
- Number of Rows – Choose how many rows of thumbnails can be displayed on the Gallery’s landing page before continuing onto additional pages.
- Media Information – The Media Information pull-down let’s you choose how to display image titles on the Gallery landing page.
– Show Title on Hover means the title will appear when you move your mouse over the image.
– Show Title Below means the title will appear below the image on the Gallery landing page.
– Show Nothing means the title will not be displayed.
The remaining options, under the Presentation Settings heading, govern the Gallery’s display settings for the slideshow view:
- Allow downloading of the original image – Click this checkbox if you would like people to be able to download the images in your Gallery. (You’ll have a chance to specify the copyright information for the pictures in a moment.)
- Show media on a full page – If you select this option, when people click on a Gallery image, it will take them to a new page with the full-size image, its title, and its description.
- Show media in a lightbox – If you select this option, when people click on a Gallery image, it will display the full-size image in a lightbox window that will appear as an overlay on the Gallery’s landing page.
- Show Title and Description – Check this box if you would like the image title and description to be displayed in the lightbox window. Note: Both the full page and lightbox options will let people move easily back and forth between the full-size Gallery images. Try both options, and choose whichever one you prefer.
- Once you’ve decided on all of your gallery settings, check the next pull-down, under the “Belongs To” heading, and make sure it says the name of the User Group for which you’re creating the Gallery.
- Scroll down to the bottom of the page and click the “Save” button to create your new Gallery.
Adding Media to a Gallery:
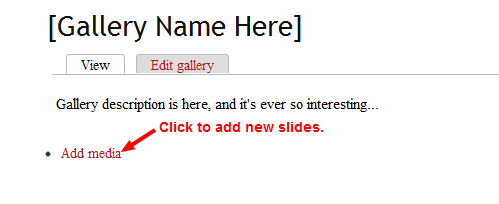
Now that you’ve created a new Gallery, it’s time to add some images to it. You’ll see the Gallery landing page, which will look something like this:
- Click on the Add Media link.
- This window will give you two choices for where to get images for the Gallery:
- On the Upload tab, you can drag and drop files from your computer (or click the Add Files link to browse for them) and hit the Start Upload button.
OR - You can also go to the Library tab, and select images to add to your Gallery from among the images that you have previously uploaded to the site. Select the images you want to add (select more than one by holding shift while you click), and hit the Submit button.
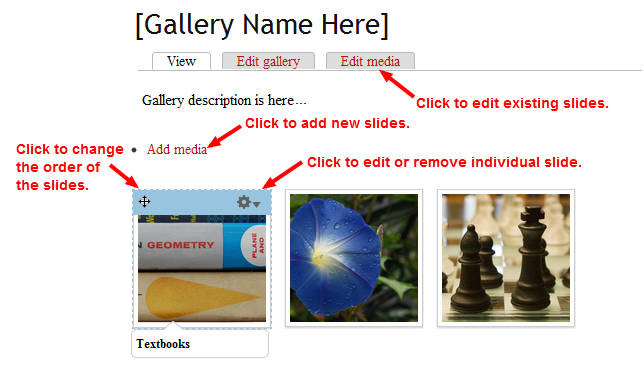
- Once you’ve added the images you want, it will take you back to the Gallery landing page, which will look a little different:
- Click the Edit Media tab in the upper-right to add titles and descriptions for your images.
- This page will show all of the images you’ve selected to include in the Gallery with a set of options for each image. Here’s what you’ll want to add to each of them:
- Title – This is a title for the image file, which will be displayed according to the Gallery Settings options discussed above.
- Description – This is where you can add a description/caption information for the image.
- Tags – Tags are optional, and won’t appear anywhere on the slideshow, but they will make it easier for searches (both from within your site and from search engines) to find the image. You can add as many tags as you like, separated with commas.
- License Settings for this Image – You can use this pull-down to choose what type of copyright permissions you’d like to assign to this image. You can opt either to reserve all rights, or choose from among the different Creative Commons licenses. For more information on Creative Commons, visit their site:http://creativecommons.org/
- Nivo Slider Link – Important: Leave this option blank. (It’s only for the Homepage Slideshow.)
- Fill out each field for all of your Gallery images, and click the Save button at the bottom of the page to see your finished Gallery.
Creating a Group Page:
- Go to the user group for which you want to create a Group Page.
- Click the Group Page link at the top of the page.
- On the Create Group Page screen, enter a Title for the page.
- In the Body section, enter the content you would like to appear on the page. Add as much text as you like.
- You can also add images by clicking the Add Media button to the far right on the toolbar. This window will give you two choices for where to get images (this will look familiar, if you’ve already created a Gallery):
- On the Upload tab, you can drag and drop files from your computer (or click the Add Files link to browse for them) and hit the +Start Upload button.
- You can also go to the Library tab, and select images to add to your Group Page from among the images that you have previously uploaded to the site. Select the images you want to add (select more than one by holding shift while you click), and hit the Submit button.
- If you want to edit an image that you’ve already added to the page, right-click on the image and choose Image Properties. (You can also left-click on the image and hit the Image button (which looks like a tiny framed picture) in the middle of the toolbar.) This will give you lots of options for the size, alignment, and spacing of the image.
- Once you’ve added all your text and images, scroll down to the Belongs To pull-down and check that the correct user group is selected. (It should be selected by default.)
- Scroll to the very bottom of the page and click the Save button to create your new Group Page.

